FlexRX
A Utility to Compensate For Flexure in Guide Scope Configurations
By Andre Paquette (andre@astrogeeks.com)
Index
Overview
Many amateur astronomers use a guide telescope to monitor a star’s position and keep it centered while taking images through a larger telescope. Guide scopes are commonly used because:
However, they have a large disadvantage over other options -- the field in the guidescope tends to drift relative to the field in the imaging scope, limiting the exposure time that can be achieved. This is called differential flexure, which occurs for many reasons, including:
MetaGuide is a great software solution for guiding that includes many unique features. One of these features is called “shift guiding”. Intended for tracking comets or other moving objects, shift guiding moves the guide star along at a specified rate in order to keep the object stationary while it is imaged. If we knew the rate of differential flexure between the imaging scope and the guide scope, this feature could also be used to compensate for the flexure.
Plate solving is a well known process for determining the exact center of an astronomical image in celestial coordinates, as well as the orientation of and distortion within the image. There are quite a number of applications available for plate solving and a standard exists to embed this information within astronomical FIT images.
FlexRX combines plate solving with MetaGuide’s shift guiding, allowing us to determine the motion of the guide scope relative to the imaging scope and apply a correction to reduce the error. At least two images are required for FlexRX to estimate the flexure and so compensation will not begin until at least that many images have been taken.
Examples
Early Testing
This early example below shows two 10-minute exposures with and without compensation for flexure. It is clear that flexure compensation improves image quality in this guide scope configuration.
|
|
|
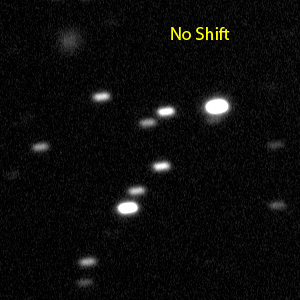
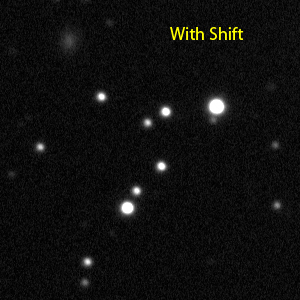
This was taken on a 14” SCT at F/11 and the image scale is 0.48”/pixel.
Guiding was done via an 80mm piggybacked guide scope.
Hyperstar Example
Although I normally use off-axis guiding, that option is not available when doing hyperstar imaging. In this configuration, I use an 80mm guide scope. Exposures are usually fairly short at F/2 but when doing narrowband images I'd like to get up to 5 minutes and the flexure is fairly noticeable even at the coarser image scale.
The image below is IC405 in Auriga and is composed of 18 5-minute exposures. Click on the image for more information and access to full resolution.

Long Focal Length Imaging
As a good test of FlexRX I decided to do some imaging in my long focal length configuration: 14" of aperture at F/11 with 9um pixels gives 0.48"/pixel. The image below is of the Horsehead nebula and NGC2023 taken in this configuration and guided with an 80mm guidescope with MetaGuide and FlexRX. Click on the image for more information and for access to full resolution.

You can see an example 10 minute sub without FlexRX here:
http://www.paquettefamily.ca/astro/20121214_horsehead_no_flexrx.jpg
And an example 10 minute sub with FlexRX is here:
http://www.paquettefamily.ca/astro/20121214_horsehead_with_flexrx.jpg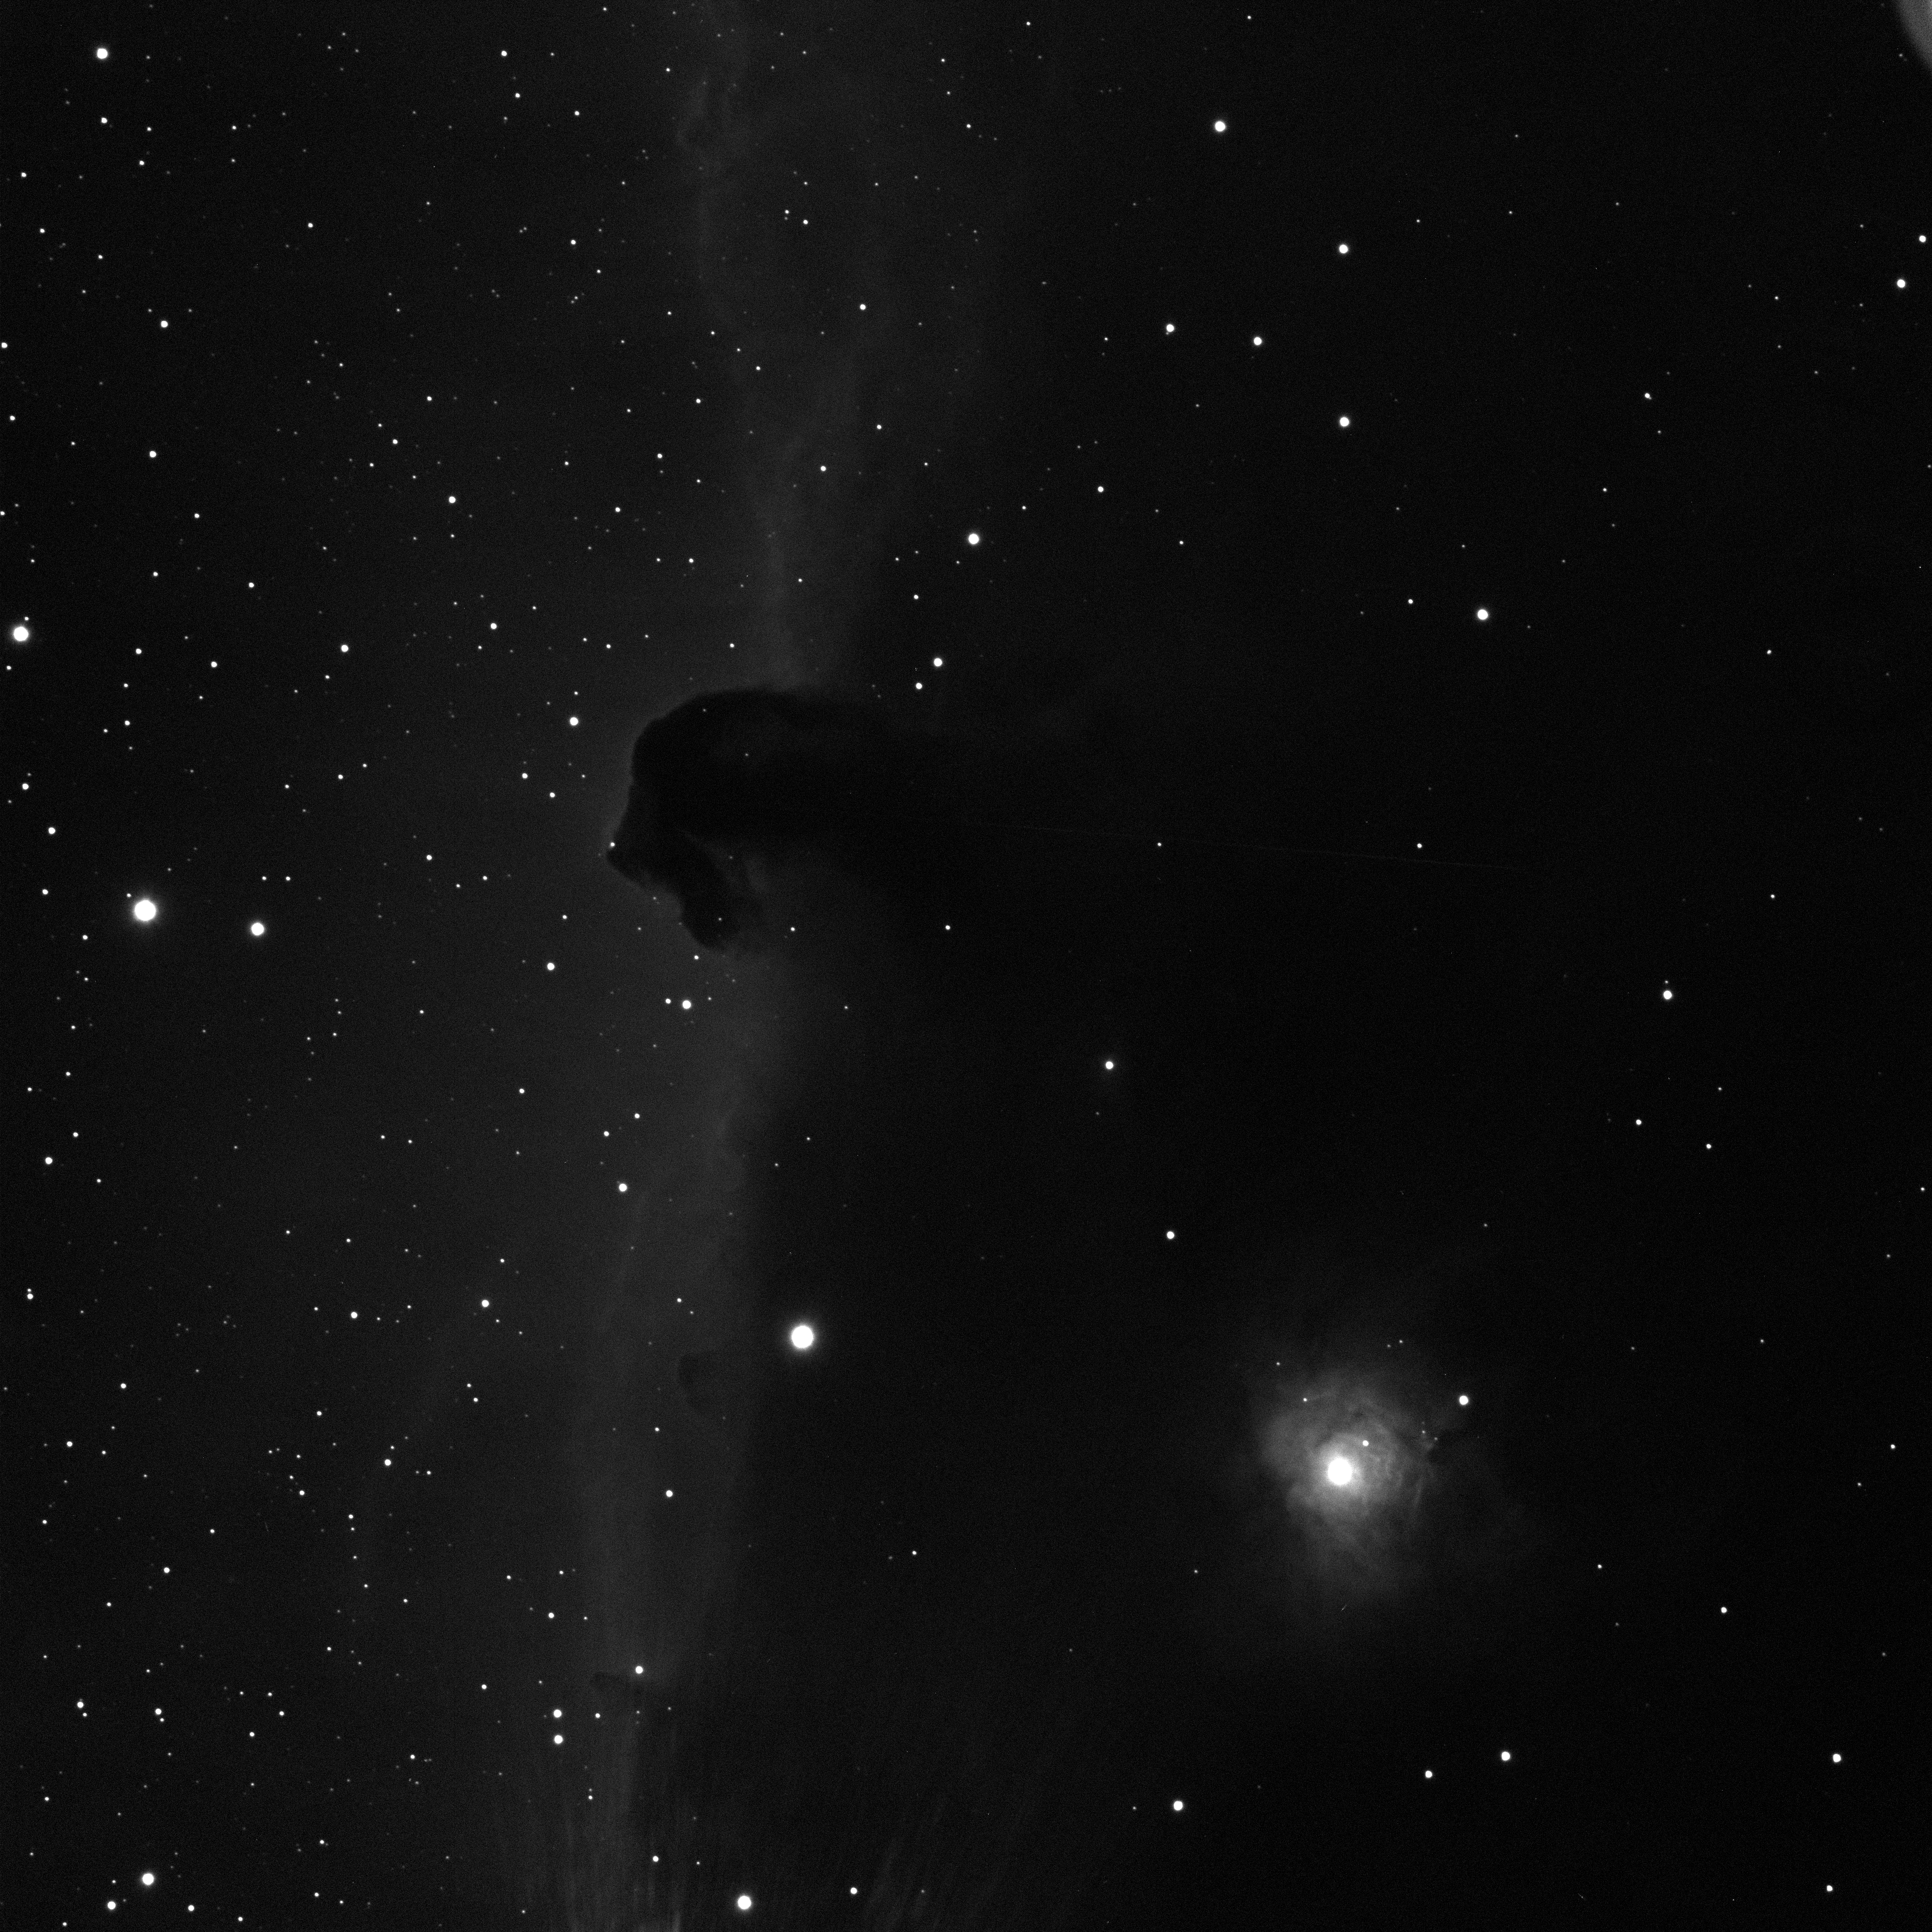
Comet Imaging
To test the "Shift Bias" feature of FlexRX, I imaged comet C/2012 K5 (Linear). The image below was 4 5-minute exposures with flexure compensation enabled. Click on the image for more information and for access to full resolution.

M82
Here's a recent image of M82 taken with FlexRX. Exposures were 900s.

Requirements
MetaGuide
FlexRX requires a PC computer capable of running the MetaGuide software. MetaGuide version 5.1.0 or later is also required. See the FlexRX download link for how to install this version of MetaGuide. More information about MetaGuide can be found online at the link below.
http://www.astrogeeks.com/Bliss/MetaGuide/index.html
With this version of MetaGuide, you need to have the X axis of the guide camera aligned with the RA axis of the telescope.
In turn, MetaGuide requires a video camera with a DirectShow driver as the guiding camera.
Imaging Setup
For imaging, a guide scope and imaging scope are required. The picture below shows an 80mm guide scope with a 14” imaging scope and camera.
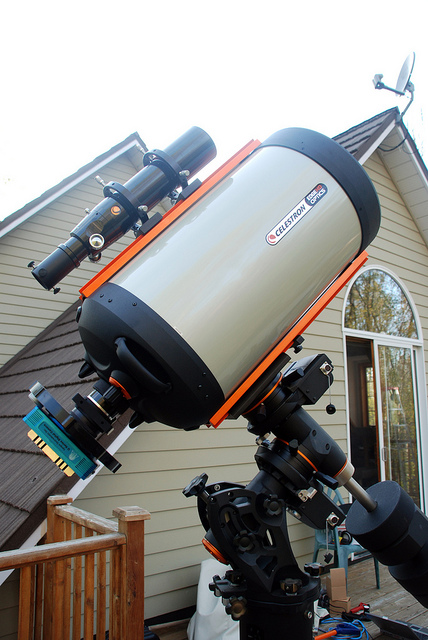
Plate Solving
There are two supported options for plate solving: MaximDL/Pinpoint, and PlaneWave Instrument’s PlateSolve2. In both cases, the acquisition software needs to be configured to store the time, and approximate mount position with every image. This often happens automatically when the acquisition software is connected to the telescope mount via ASCOM or some other method.
PWI PlateSolve2
PlateSolve2 is a fine application for
performing plate solves on FITS images. Written by Dave Rowe, PlaneWave Instruments employs this application for several
purposes in their software offerings. It can also be used in a standalone
environment.
Two downloads are required for PlateSolve2: the application and the UCAC3
catalog. They can be found under "PlateSolve2"
at the link below. (Note that the APM catalog can be omitted.)
http://old.planewave.com/index.php?page=4
FlexRX has direct support for PlateSolve2 and invokes the application directly to solve images.
MaximDL/Pinpoint
Many imagers will likely already have MaximDL for acquisition and processing of images. A free version of Pinpoint is available for use with MaximDL and can be used to solve images as they are acquired. In MaximDL V5’s Autosave Setup window, there is a box at the top-right called Astrometric Resync. If this option is set to “Solve Only” with Interval=1, it will plate solve every image that is acquired. For the plate solve to succeed, it is important to have the focal length of your setup configured properly under Maxim’s File->Settings->Site and Optics menu. You also need to have Maxim connected to the mount to obtain the approximate celestial position – usually this is done via ASCOM.
Before jumping into FlexRX, it is important to be confident with using MetaGuide and the plate solving requirements. The following information assumes that you have MetaGuide installed and can use it to guide while imaging. It also assumes that you either have PlaneWave’s PlateSolve2 installed or you have MaximDL/Pinpoint configured to solve images as they are acquired. You can launch PlateSolve2 and open an image you have acquired to test that it platesolves properly. Similarly, if using MaximDL/Pinpoint you can watch to see if Pinpoint is invoked and succeeds when AutoSaving images.
When ready to start, it is important to launch MetaGuide before FlexRX so that they can communicate properly. MetaGuide should be calibrated and guiding/locked on a star before FlexRX is used.
The steps to using FlexRX are fairly simple and include:
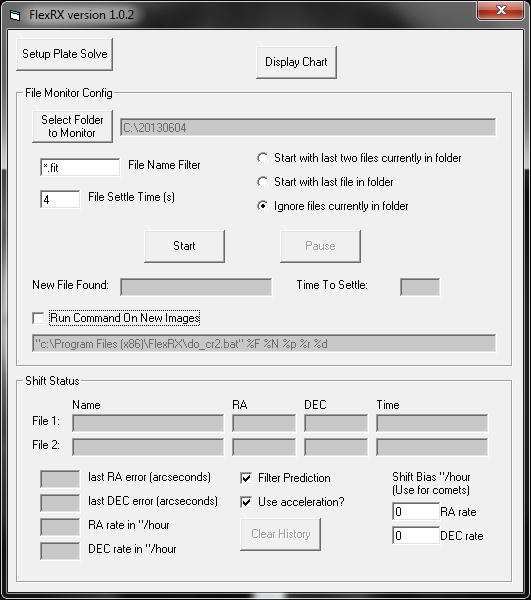
The image below shows the main FlexRX window. Instructions that follow make reference to this image.
Configuring Plate Solving
Click the “Setup Plate Solve” button from the main window of FlexRX to configure the details for plate solving. The image below shows the Setup Plate Solving window.
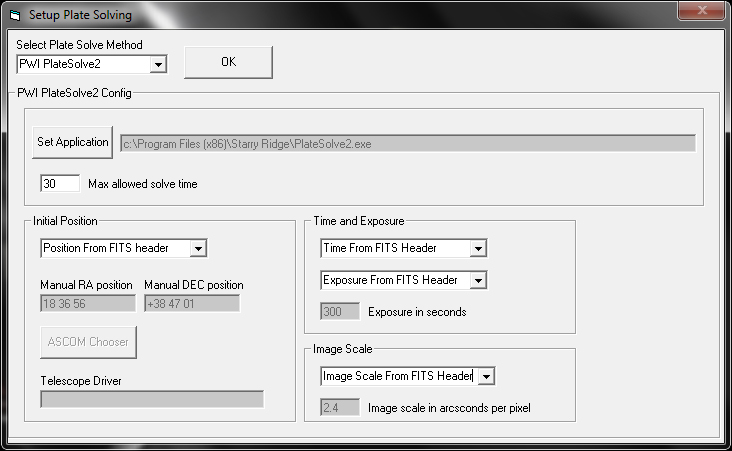
There are two main choices under “Select Plate Solve Method”: PWI PlateSolve2, and WCS/Pinpoint.
Maxim/Pinpoint/WCS
If you already have Pinpoint installed and are familiar with it then I recommend trying that option first. When FlexRX sees a new image file appear, it scans the file for the CRVAL1 and CRVAL2 FITS metatags to retrieve the celestial coordinates for the center of the image. If this data does not appear in the file then FlexRX will pop up an error and will not process the file. When using the Maxim/Pinpoint option, the File Settling Time setting in the main window should be fairly large (I recommend 10s or longer) because Maxim first saves the file then solves it, then updates the file. The large settling time ensures that FlexRX only looks at the image after it has been solved. Note that any plate solving utility that supports standard WCS (world coordinate system) FITS tags should work with this option – not just Maxim/Pinpoint.
PWI PlateSolve2
In addition to being very fast, PlaneWave’s PlateSolve2 application is very tolerant to distorted stars, so it is worth trying if other solving software is not working well. With this option selected, you need to set the path to the PlateSolve2 application. Do this by clicking on the Set Application button and browsing to the location where you installed PlateSolve2.
The Max allowed solve time setting can be used to limit how long PlateSolve2 will be allowed to take. Usually it is very fast, but if there are severe issues with the image or the image scale is incorrect then it may never complete. This setting aborts after a specified time has passed.
The file settling time for this option can be small – 2s should be fine. When FlexRX processes an image using this option, you will see the PlateSolve2 application appear for a short time and platesolve the image, then it will automatically close.
Normally FlexRX and PlateSolve2 require the DATE-OBS, OBJCTRA, OBJCTDEC, FOCALLEN, XPIXSZ, and EXPOSURE tags in the FITS header. If one or more of these parameters are missing, you can configure FlexRX to override the settings to provide the data in other ways. If the initial position is overridden it can be either specified manually by entering RA and DEC values or you can configure FlexRX to retrieve the position from the telescope directly via the ASCOM chooser. If the observation time is overridden, it is retrieved from the file timestamp. Exposure time and image scale are overridden with manually entered values.
Note that it is recommended to configure PlateSolve2 such that the Max Star Size parameter is 12 sigma. This can be done by manually starting PlateSolve2, selecting View->Parameters and setting the Max Star Size value to 12. This setting will be retained when the application exits.
File Monitoring
FlexRX watches for new image files to appear in a specified folder. Your acquisition software should be configured to save files to this location. To select the folder, click the Select Folder to Monitor button and browse to the desired folder. You can also configure a filename filter to select specific files to monitor. The default is any FIT file (*.fit) but you can change this by entering your own filter to the left of the File Name Filter label.
When you start monitoring, you can choose to have FlexRX start processing one, two, or none of the files that already exist in the folder. If files exist from a previous date then they should not be used as part of the current imaging session. Choose the number of files to use by selecting one of the options above the Pause button. The last files by date will always be used. To start monitoring, simply click the Start button. When new files appear you will see the name in the New File Found box and the Time to Settle box will count down to zero at which point the file is processed.
When monitoring is active, you can click the Stop button to halt the flexure compensation. This will stop shifting in MetaGuide. You can also click the Pause button to pause/resume the monitoring. When paused, the last shift state is maintained but new files that appear in the folder are ignored.
Once two or more files are processed, FlexRX will enable shifting in MetaGuide and start compensating for flexure. The current information for each file is displayed in the Shift Status frame. Similarly, the current shift rate and last error is displayed in this area.
By default, a filter is used to predict the best correction rates to apply. This can be enabled or disabled using the Filter Prediction checkbox. When the filter is disabled, the last two images are used to directly determine the next correction rate. When filter prediction is enabled, Acceleration modeling can also be enabled or disabled. This accounts for acceleration in a very basic way, by predicting what the velocity will be in the middle of the subsequent exposure. If the flexure is very noisy and random then acceleration should be disabled. If the rate of change is smooth then a small improvement should be seen by leaving it enabled.
Scripting
An experimental feature has been added that allows a user-specified command to be run when a new file in the monitor folder is found. The intention of this feature is for conversion from non-FIT files (such as raw DSLR formats) to FITS format for use with FlexRX.
In order to pass the filename and path to the command, certain strings within the command will be expanded in various ways as detailed below:
An example batch file (do_cr2.bat) is installed with FlexRX in the program folder. To run this batch file the command would be set to:
“c:\Program Files (x86)\FlexRX\do_cr2.bat” %F %N %p %r %dPlease examine the batch file for more details.
If the command writes to a file called “filename.txt” in the monitor folder then FlexRX will read that file and process the filename contained within instead of processing the file that it just found.
MetaGuide Configuration
For normal autoguiding, MetaGuide simply needs to keep a star centered on a fixed position in the camera. To do this, it just needs to know how the guide star position in the camera relates to the guide pulses on the mount.
For shift guiding with FlexRX, MetaGuide needs to go a step further: to shift the star in a specific direction, it also needs to know how the guide pulses on the mount relate to actual position in the sky.
MetaGuide version 5.1.0 and later makes this possible in one of two ways: The easiest method is to connect MetaGuide to an ASCOM interface to the mount while it calibrates. This gives it enough information to determine the sign of the guide pulses relative to the sky. It sets the “EWReversed” and “NSReversed” checkboxes automatically after calibration based on what it learns from the connection to the mount. These settings may change if the side of meridian is changed on an equatorial mount, or they may change with different optical configurations, so it is useful to re-calibrate with ASCOM connected if there is any doubt about the signs.
If you do not have an ASCOM connection to the mount you can set the EWReversed and NSReversed checkboxes manually. They need to be set such that positive East shift rates move the scope in increasing Right Ascension and positive North shift rates move the scope in increasing Declination.
Tracking Comets or Asteroids
MetaGuide’s shift guiding feature is a great way to guide on moving objects like comets or asteroids. Since FlexRX uses this feature to compensate for flexure, the comet rates need to be configured in FlexRX instead of in MetaGuide. To guide on a comet and compensate for flexure at the same time, enter the Shift Bias (the rate of the object) in FlexRX before starting the file monitoring. As soon as file monitoring is started, the comet shift rate is applied and when sufficient images are available to evaluate flexure the rate is adjusted to compensate.
Note that shift bias is expressed in arcseconds per hour and can be obtained from the JPL Horizon’s web interface at the link below:
http://ssd.jpl.nasa.gov/horizons.cgi
Use the Target Body setting to find the object you will image. Under Table Settings, enable “Rates; RA & DEC” . Under Time Span, enter the time in UTC over which you will view the object. The dRA*cosD column can be entered in the RA Rate field of FlexRX and the d(DEC)/dt column can be entered in the DEC Rate field.
Alternatively, you can use Horizon-Tool to fetch an object’s rates and push it into FlexRX. More information and download for Horizon-Tool can be found at the link below:
http://www.astrogeeks.com/AstroGeeks/andre/horizon-tool/horizon-tool.htm"
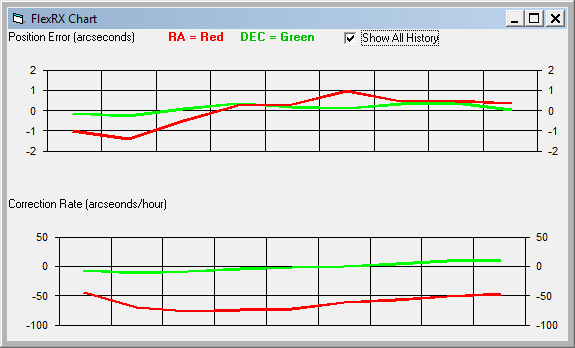
Charting
To show the history of position error and flex rates over time, click on the Display Chart button from the main FlexRX window. You can choose to display only the last 5 data points or the entire data set with the Show All History text box. An example chart is shown below.
Download
Download FlexRX version 1.0.7b at the link below:
FlexRXInstall_v1.0.7b_new.zip
FlexRX requires MetaGuide version 5.1.0. To install it, see the main MetaGuide page below:
http://www.astrogeeks.com/Bliss/MetaGuide/index.html
With this version of MetaGuide, you need to have the X axis of the guide camera aligned with the RA axis of the telescope.
| Version | Date | Changes |
| 0.0.1 | 20121122 | Initial Revision |
| 0.0.3 | 20121201 | Fixed a bug causing oscillations after 3rd image |
| 0.0.6 | 20121213 | Added Kalman filter, redid UI. |
| 0.0.7 | 20130103 |
|
| 0.0.8 | 20130119 |
|
| 0.0.11 | 20130128 |
|
| 0.0.12 | 20130219 |
|
| 0.0.13 | 20130227 |
|
| 0.0.15 | 20130329 |
|
| 0.0.16 | 20130330 |
|
| 0.0.18 | 20130420 |
|
| 0.0.20 | 20130428 |
|
| 1.0.2 | 20130606 |
|
| 1.0.4 | 20130720 |
|
| 1.0.7b | 20240602 |
|